Workday
| Version | 0.6.1
|
| Managed integration release status | GA |
| Subscription level What's this? |
Basic |
| Developed by What's this? |
Elastic |
| Ingestion method(s) | API |
| Minimum Kibana version(s) | 9.1.0 8.19.0 |
You can use this integration as an Elastic Managed integration on Elastic Cloud Hosted deployments running this version or later.
To use pre-release integrations, go to the Integrations page in Kibana, scroll down, and toggle on the Display beta integrations option.
Workday is a cloud-based ERP system that manages business processes and allows organizations to use an integrated application. Workday is a coherent cloud ERP system for financial analysis, analytical solutions, HCM suites, and better business processes.
The Workday integration for Elastic collects Activity logs via the Workday API, and Sign-on and User inventory logs via the Workday Custom Report API, and visualizes them in Kibana.
- The Activity data stream is compatible with Workday API version v1.
- The Sign-on and User data streams are compatible with Workday Custom Reports exposed via the Reports as a Service (RaaS) JSON endpoint (
/ccx/service/customreport2/...?format=json).
- Activity: This integration periodically queries the Workday API to retrieve Activity logs.
- Sign-on: This integration periodically calls a Workday Custom Report (RaaS) JSON endpoint. On each poll it supplies the report's required From Moment / To Moment prompts (
From_Moment/To_Momentquery parameters), advances a collection cursor so the time window moves forward, and ingests eachReport_Entryrow as a single event. The first poll looks back by Initial Interval; later polls use Interval. - User: This integration periodically downloads a Workday Custom Report (for example, a Worker inventory report) over the Reports as a Service (RaaS) JSON endpoint. Each
Report_Entryrow is ingested as a user inventory document withevent.kind: assetso Entity Analytics / the Entity Store can seed user entities. Core identity fields map to ECS (user.id,user.name,user.email,user.roles,user.group.name); remaining HR attributes land underworkday.user.*.
This integration collects log messages of the following types:
Activity: Collects Activity Logs via the Workday API (endpoint:/activityLogging).Sign-on: Collects sign-on information from a Workday Custom Report via the Workday Reports as a Service (RaaS) JSON endpoint.User: Collects worker inventory information from a Workday Custom Report via the Workday Reports as a Service (RaaS) JSON endpoint for Entity Analytics.
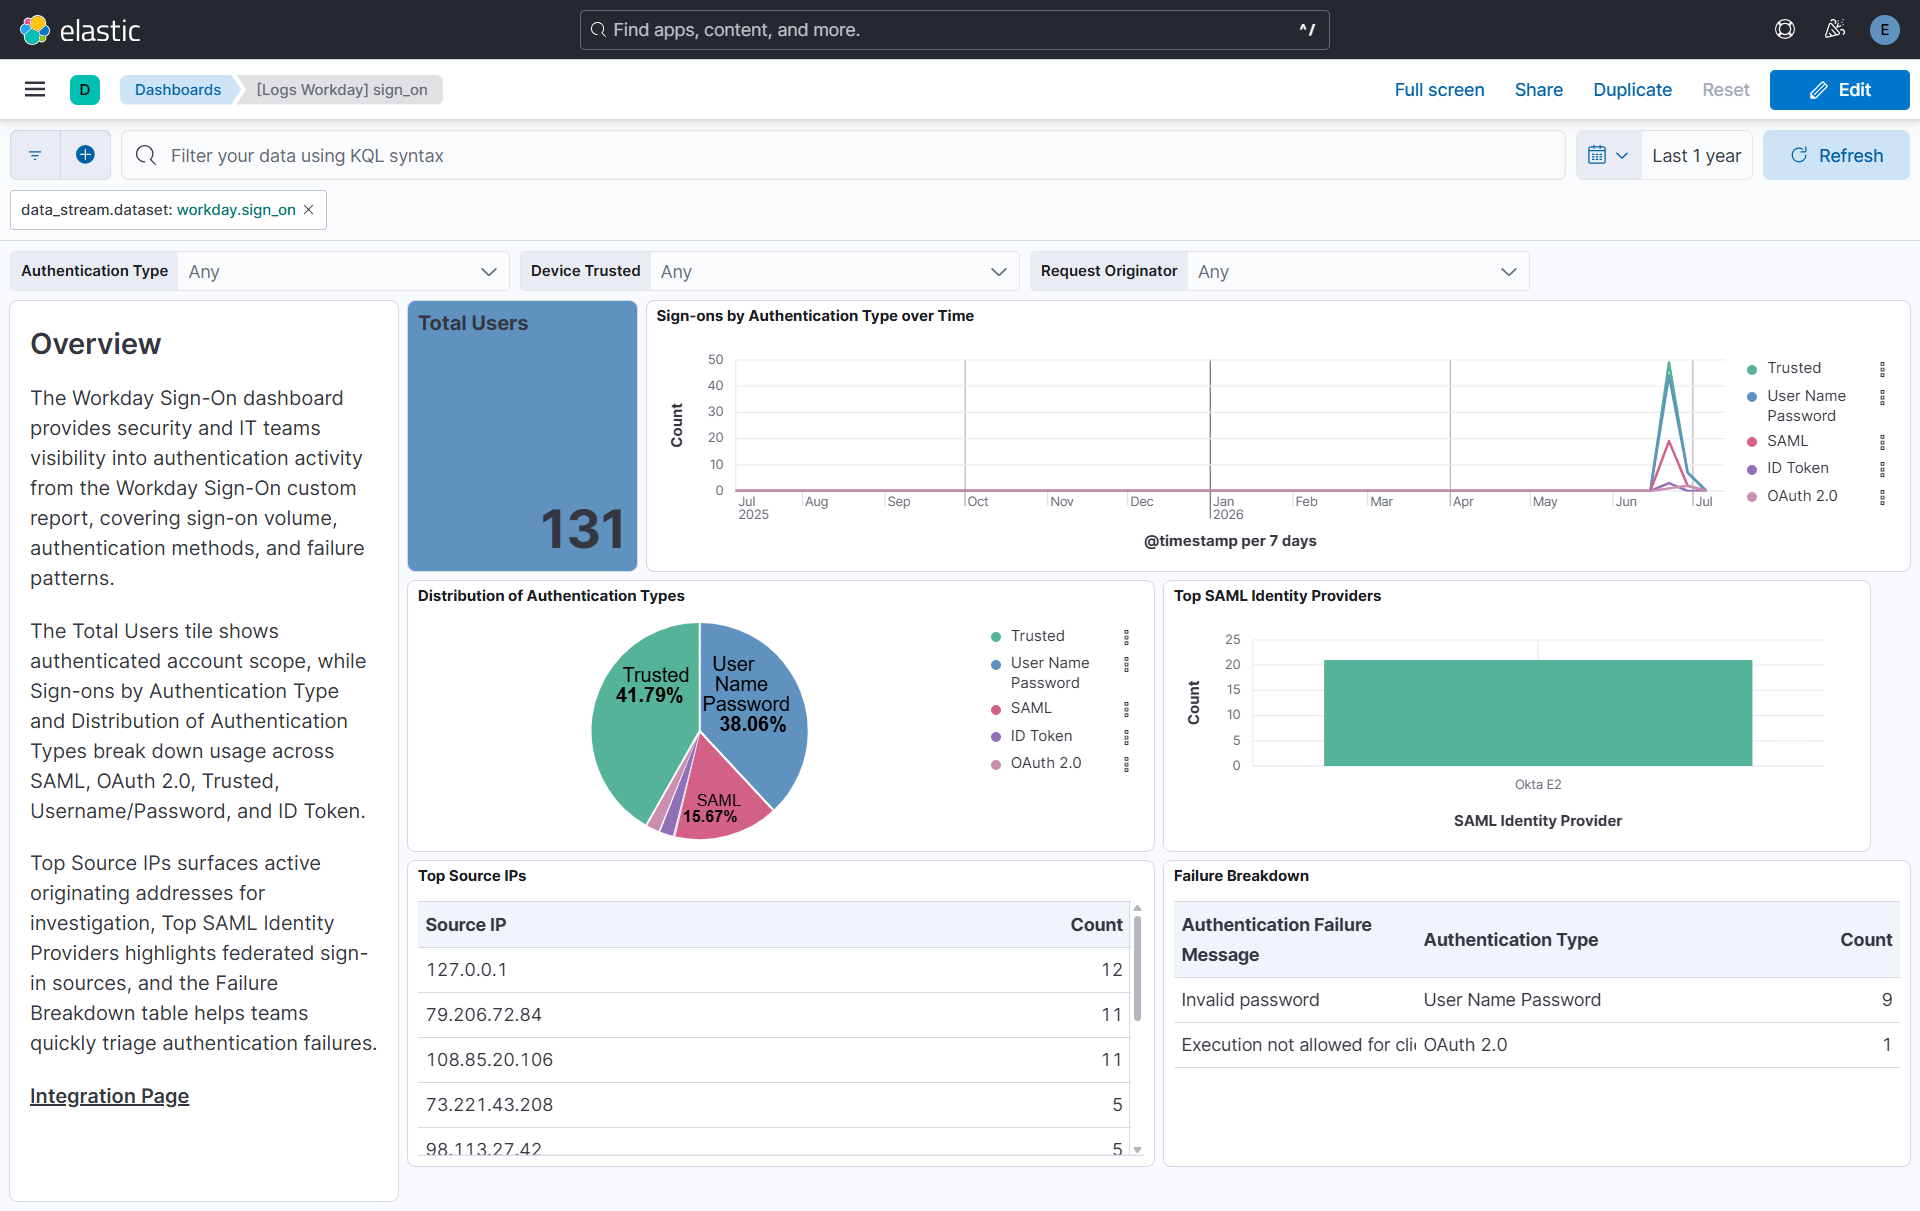
Integrating Workday with Elastic gives security and IT teams centralized visibility into Workday activity logging, Workday sign-on data, and Workday worker inventory, so you can monitor configuration and usage changes, track sign-on activity and access patterns, monitor new hires and terminations, support audits, and investigate suspicious or unusual authentication behavior from Kibana.
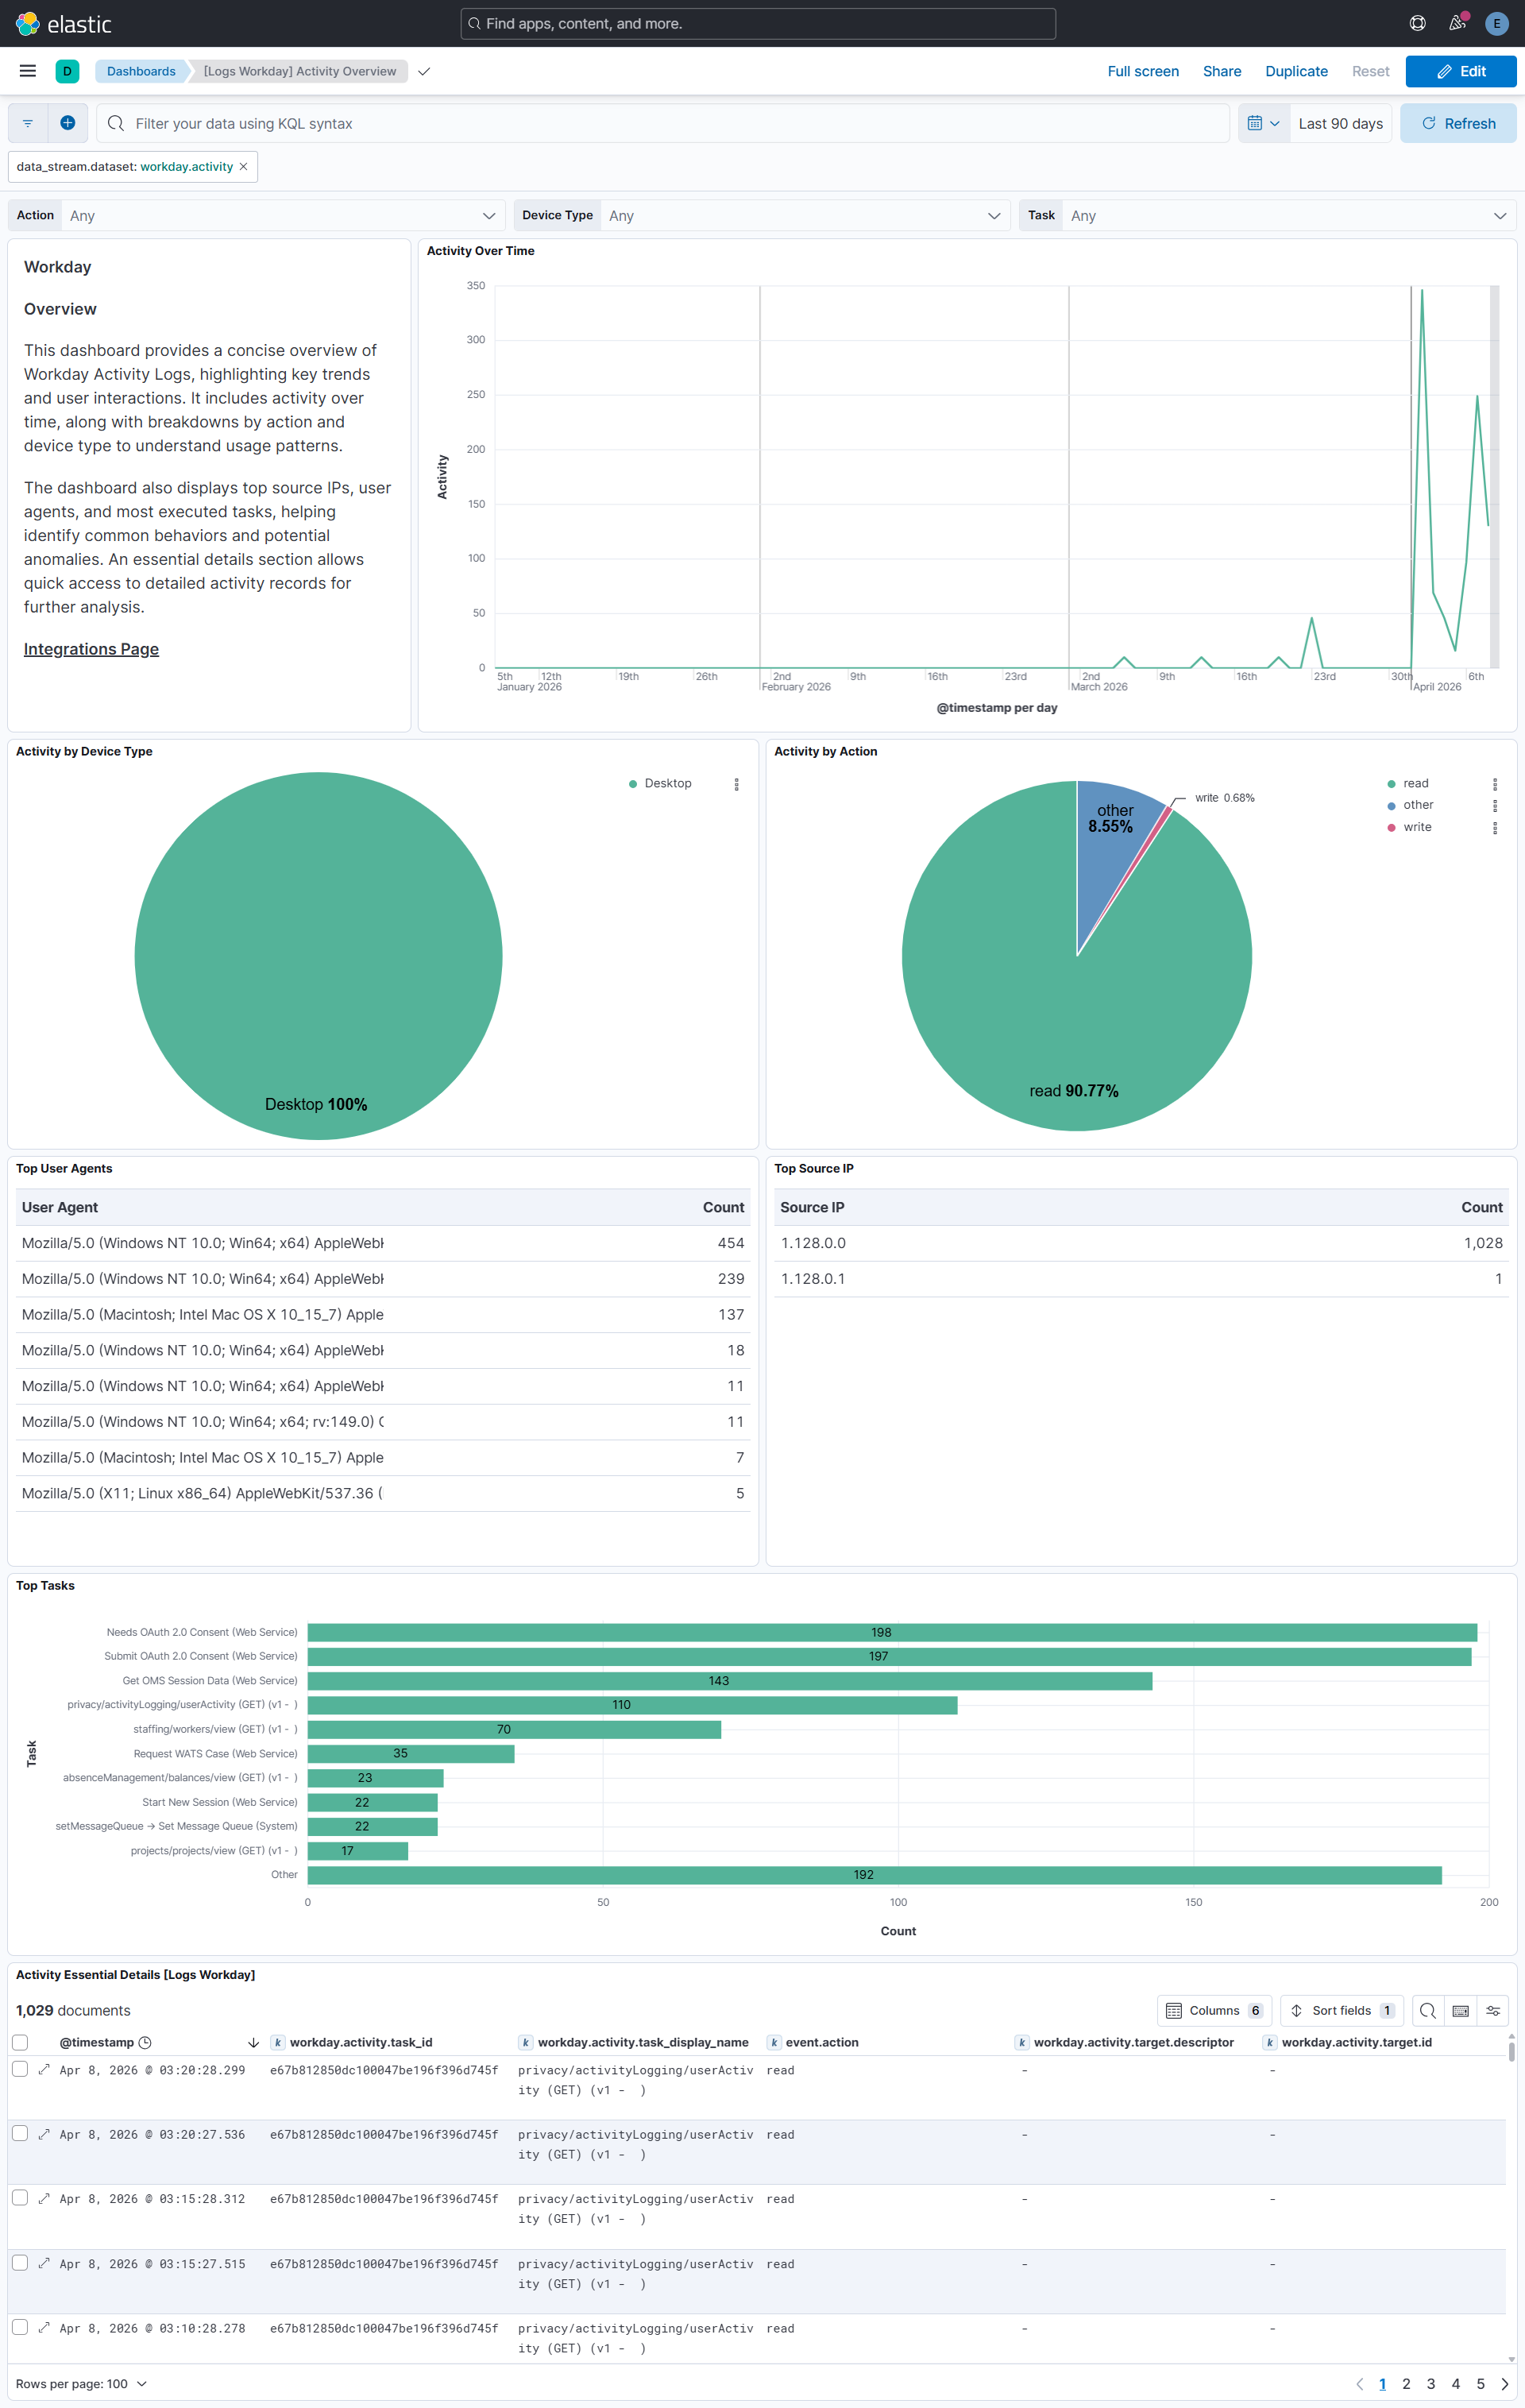
The Activity dashboard summarizes key patterns such as activity volume over time and top actors, helping you spot unusual spikes and focus on the users and operations that matter. Built-in filters make it easier to narrow events by attributes such as task, system account, and IP address, which supports faster triage and a more consistent investigation workflow across your Workday telemetry.
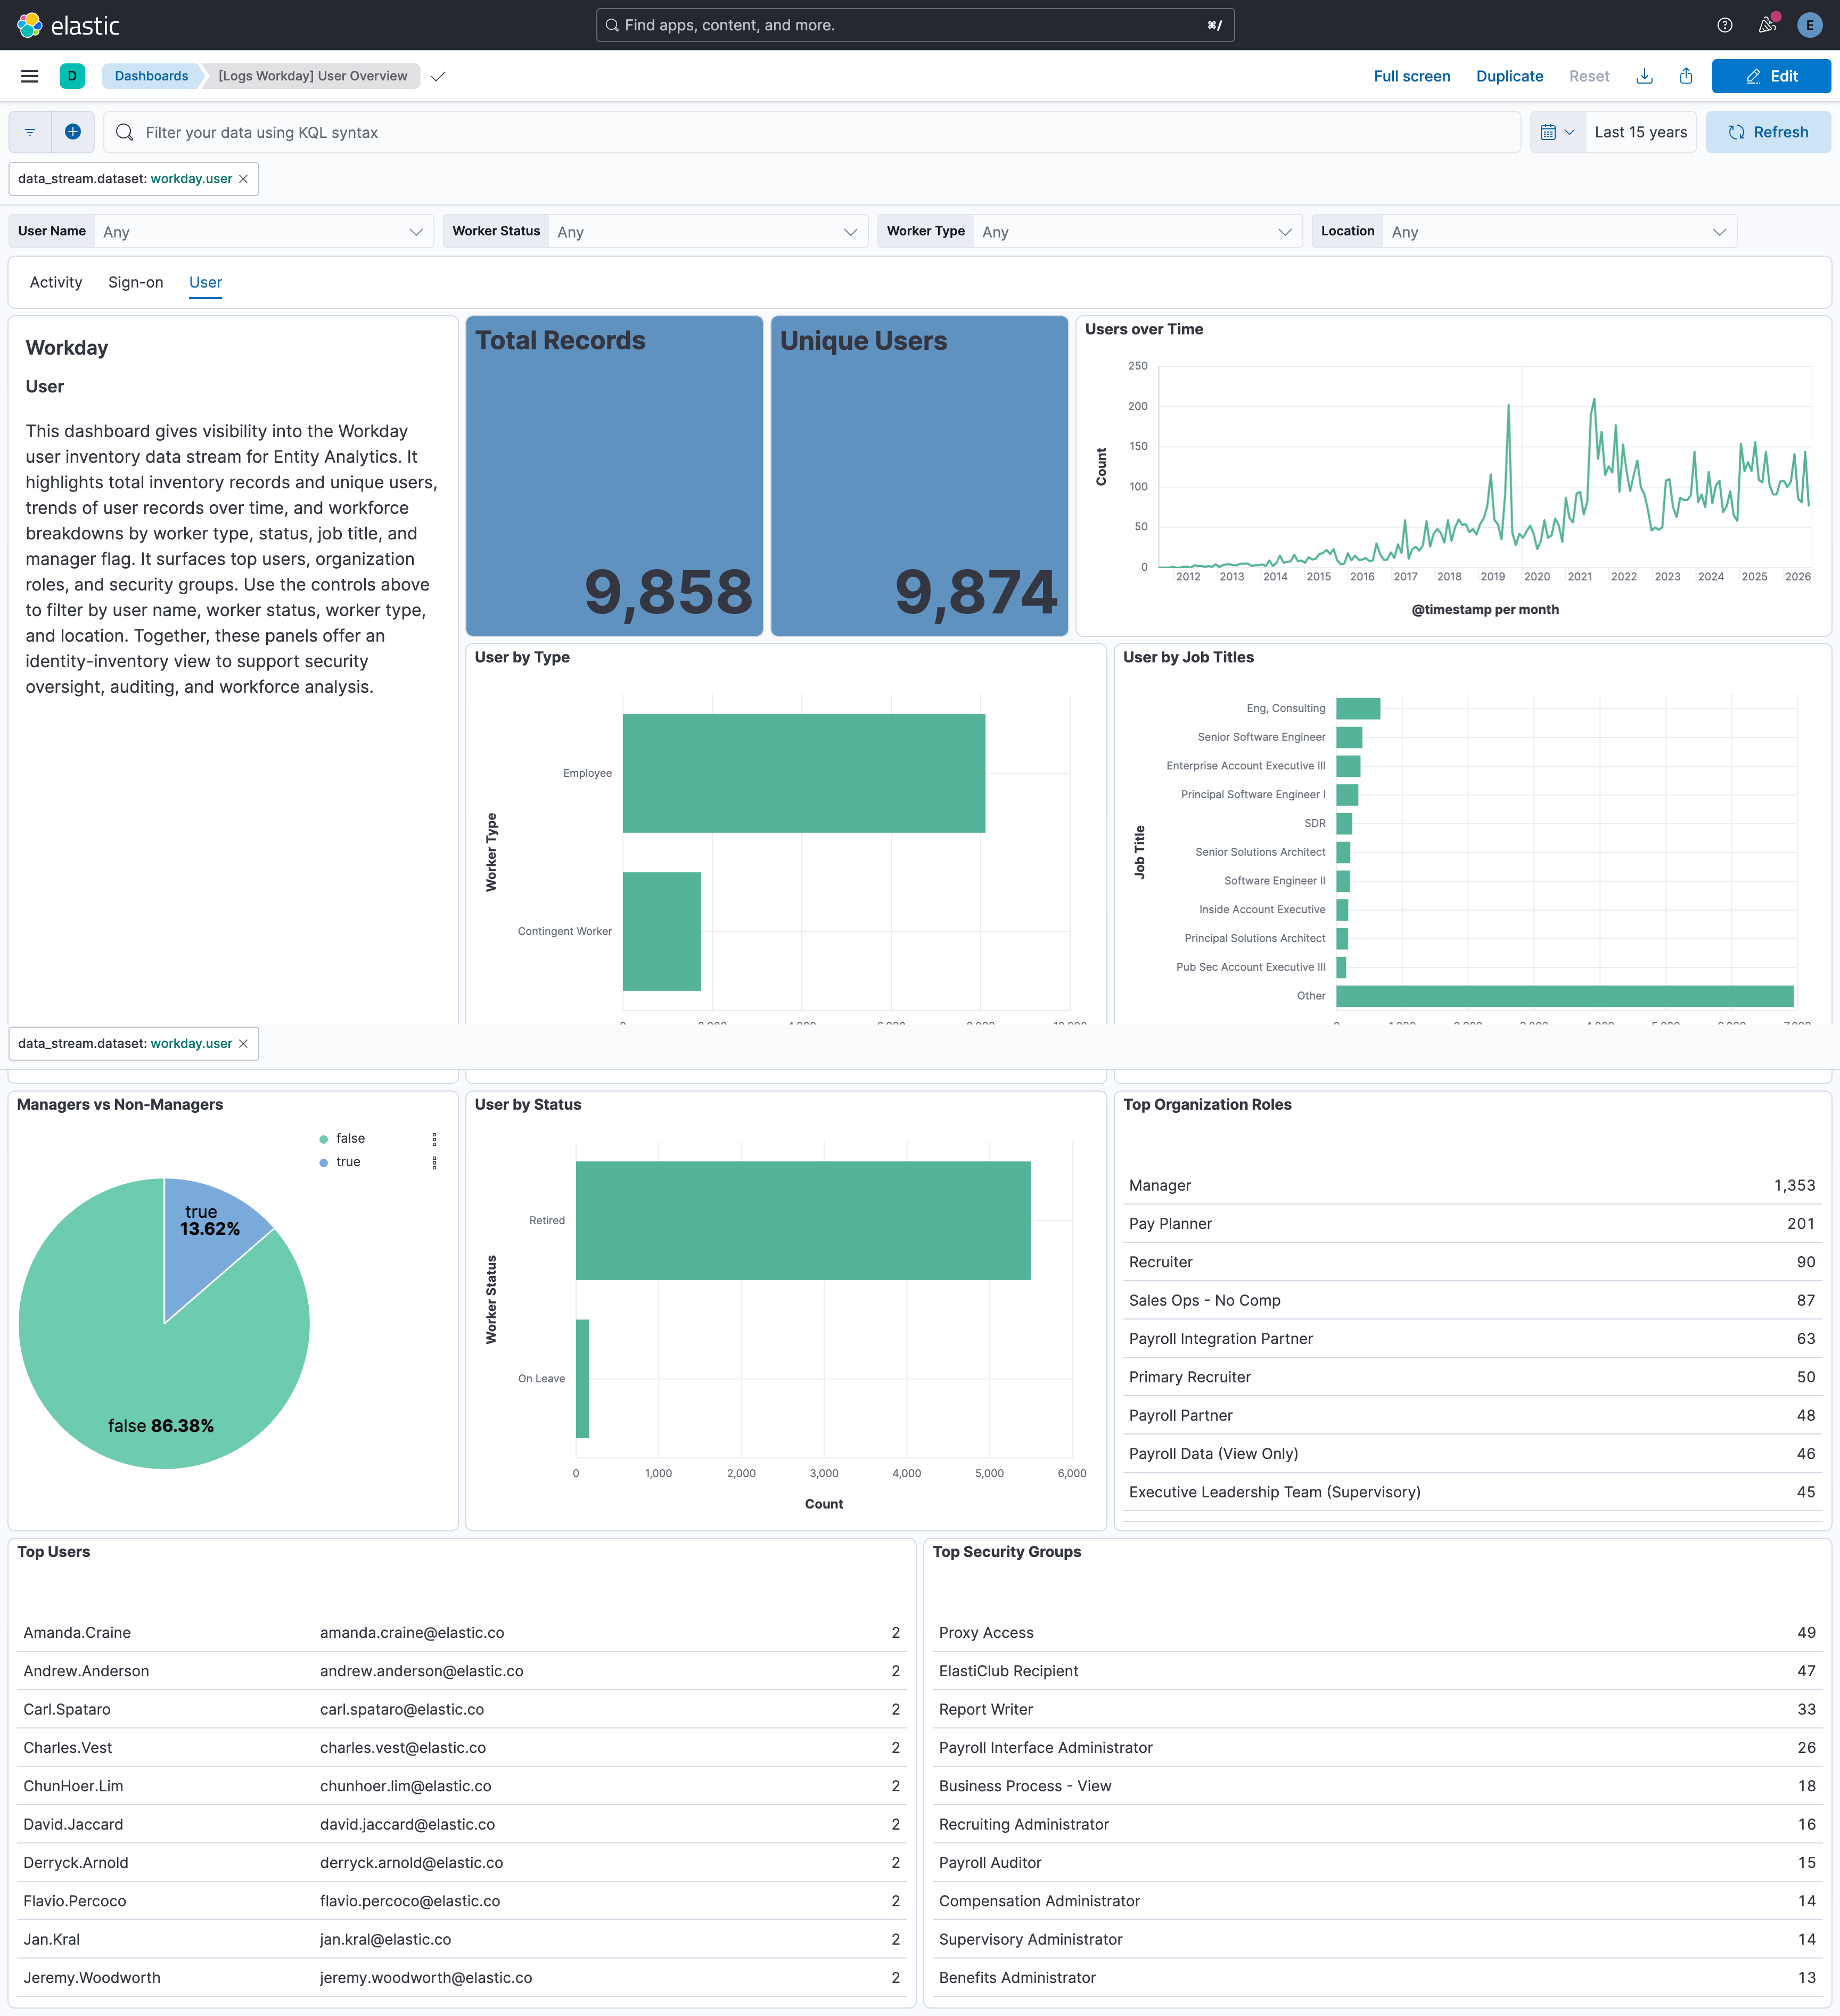
The User Overview dashboard summarizes worker inventory patterns such as users over time, top worker types and statuses, top job titles, organization roles, and security groups, with filters for attributes such as user name, worker status, worker type, and location. Use it to validate inventory coverage and support identity and leaver investigations alongside Entity Analytics.
- Sign in to your Workday tenant as a Security Administrator.
- In the Workday search bar, search for and open the Edit Tenant Setup - System task.
- In the Security section, select the Enable User Activity Logging checkbox.
- Click OK to save the changes.
Once enabled, Workday records all user activity in a secure tenant database. Activity logging must be enabled before any logs are available for export.
- In the Workday search bar, search for Create Integration System User.
- Enter a User Name (for example, ISU_SIEM_Export) and a strong Password.
- Clear the Require New Password at Next Sign In checkbox.
- Click OK.
- Search for Create Security Group and create an Integration System Security Group (Unconstrained).
- Add the ISU (ISU_SIEM_Export) to this security group.
- Search for View Domain and locate the User Activity Logging domain. Grant Get access to the ISU security group for this domain.
- Search for Activate Pending Security Policy Changes and activate the changes.
- In the Workday search bar, search for Register API Client for Integrations.
- Enter a Client Name (for example, SIEM_OAuth_Client).
- Select the Non-Expiring Refresh Tokens option.
- Add the scope: System (or the scope required for User Activity Logging API).
- Click OK.
- Copy and save the following details in a secure location:
- Client ID: The API client identifier.
- Client Secret: The API client secret.
- Search for Manage Refresh Tokens for Integrations.
- Select the ISU account (ISU_SIEM_Export).
- Generate a new refresh token for the API client.
- Copy and save the Refresh Token.
The API endpoint is based on your Workday tenant. The format is:
Component | Value
Token endpoint | https://HOST/ccx/oauth2/TENANT/token
Activity Logging API | https://HOST/ccx/api/privacy/v1/TENANT/activityLogging
Replace HOST with your Workday hostname and TENANT with your tenant name.
For additional Workday API security context, see Generating API Keys for the Workday API.
- Sign in to your Workday tenant as a user with report-authoring privileges.
- In the Workday search bar, search for Create Custom Report.
- Create an Advanced report on a data source that exposes sign-on activity (for example,
Signons and Attempted Signons). - Add the columns required for sign-on analytics (for example,
System Account,Session Start,Session End,Authentication Type for Signon,Failed Signon,Invalid Credentials,Account Locked, Disabled or Expired,Browser Type,Operating System,Device Type,Request Originator,SAML Identity Provider). - On the Prompts tab, add From Moment and To Moment prompts for the report's moment range, and mark both as Required. The integration supplies these values on each poll as
From_MomentandTo_Momentquery parameters on the RaaS URL. Do not hard-code a static range in the Report URL — a fixedTo_Momentstops collecting new events once that time has passed. - On the Advanced tab, select Enable As Web Service so the report is exposed as Reports as a Service (RaaS).
- Save the report and note the Report Name and the Report Owner (the Workday account that owns the report).
- In the Workday search bar, search for Create Integration System User.
- Enter a User Name (for example,
ISU_SIEM_Export) and a strong Password. - Clear the Require New Password at Next Sign In checkbox.
- Click OK.
- Search for Create Security Group and create an Integration System Security Group (Unconstrained).
- Add the ISU (
ISU_SIEM_Export) to this security group. - Grant the ISU security group access to the domain protecting the custom report's data source (for example, the
System Auditingdomain). - Search for Activate Pending Security Policy Changes and activate the changes.
The Custom Report endpoint URL has the following format:
https://HOST/ccx/service/customreport2/TENANT/REPORT_OWNER/REPORT_NAME?format=json
Where:
HOSTis your Workday hostname.TENANTis your Workday tenant name.REPORT_OWNERis the Workday account that owns the custom report.REPORT_NAMEis the name of the custom report you created above.
Use this base URL (with ?format=json only) as the Report URL in the integration. Do not append From_Moment or To_Moment yourself, the integration adds those on every poll from Initial Interval or the collection cursor and Interval.
- Sign in to your Workday tenant as a user with report-authoring privileges.
- In the Workday search bar, search for Create Custom Report.
- Create an Advanced report on a data source that exposes worker attributes (for example,
All Workers). - Add the columns required for worker inventory and Entity Analytics.
- Optionally filter terminated workers to a recent window (for example, the last ~30 days) to keep inventory volume manageable while still capturing leavers.
- On the Advanced tab, select Enable As Web Service so the report is exposed as Reports as a Service (RaaS).
- Save the report and note the Report Name and the Report Owner (the Workday account that owns the report).
Unlike Sign-on, the User inventory report does not use From Moment / To Moment prompts. Each poll downloads the full report result set configured in Workday.
- In the Workday search bar, search for Create Integration System User.
- Enter a User Name (for example,
ISU_SIEM_Export) and a strong Password. - Clear the Require New Password at Next Sign In checkbox.
- Click OK.
- Search for Create Security Group and create an Integration System Security Group (Unconstrained).
- Add the ISU (
ISU_SIEM_Export) to this security group. - Grant the ISU security group access to the domain protecting the custom report's data source (for example, the worker data domain).
- Search for Activate Pending Security Policy Changes and activate the changes.
The Custom Report endpoint URL has the following format:
https://HOST/ccx/service/customreport2/TENANT/REPORT_OWNER/REPORT_NAME?format=json
Where:
HOSTis your Workday hostname.TENANTis your Workday tenant name.REPORT_OWNERis the Workday account that owns the custom report.REPORT_NAMEis the name of the custom report you created above.
Use this URL (with ?format=json) as the Report URL in the integration.
This integration supports both Elastic Agentless-based and Agent-based installations.
Agentless integrations allow you to collect data without having to manage Elastic Agent in your cloud. They make manual agent deployment unnecessary, so you can focus on your data instead of the agent that collects it. For more information, refer to Agentless integrations and the Agentless integrations FAQ.
Agentless deployments are only supported in Elastic Serverless and Elastic Cloud environments. This functionality is in beta and is subject to change. Beta features are not subject to the support SLA of official GA features.
Elastic Agent must be installed. For more details, check the Elastic Agent installation instructions. You can install only one Elastic Agent per host.
In the top search bar in Kibana, search for Integrations.
In the search bar, type Workday.
Select the Workday integration from the search results.
Select Add Workday to add the integration.
Enable and configure only the collection methods which you will use.
To Collect Workday Activity logs via API, you'll need to:
- Configure Hostname.
- Configure Tenant.
- Configure Client ID.
- Configure Client Secret.
- Configure Refresh Token.
- Adjust the integration configuration parameters if required, including the Interval, Initial Interval, Preserve original event etc. to enable data collection.
To Collect Workday Sign-on logs via Custom Report API, you'll need to:
- Configure Report URL with the full Workday Custom Report (RaaS) URL noted above (include
?format=json; do not addFrom_Moment/To_Momentto the URL — the integration adds them automatically). - Configure Username and Password for basic authentication against the Workday Custom Report API.
- Adjust the integration configuration parameters if required, including the Interval, Initial Interval, and Preserve original event etc. to enable data collection.
- Configure Report URL with the full Workday Custom Report (RaaS) URL noted above (include
To Collect Workday User inventory via Custom Report API, you'll need to:
- Configure Report URL with the full Workday Custom Report (RaaS) URL noted above.
- Configure Username and Password for basic authentication against the Workday Custom Report API.
- Adjust the integration configuration parameters if required, including the Interval and Preserve original event etc. to enable data collection.
Select Save and continue to save the integration.
- In the top search bar in Kibana, search for Dashboards.
- In the search bar, type Workday.
- Select a dashboard for the dataset you are collecting, and verify the dashboard information is populated.
For help with Elastic ingest tools, check Common problems.
If collection fails with a Workday 400 validation error that From Moment (or To Moment) is required:
- Confirm the custom report's Prompts tab defines From Moment and To Moment and that both are marked Required (see Build the Sign-on custom report).
- Confirm the Fleet Report URL is only the RaaS URL with
?format=json— without hardcodedFrom_Moment/To_Momentvalues. The integration must append those parameters on each poll. - Confirm Initial Interval is set (default
24h) so the first collection has a lookback window.
For more information on architectures that can be used for scaling this integration, check the Ingest Architectures documentation.
Exported fields
| Field | Description | Type |
|---|---|---|
| @timestamp | Date/time when the event originated. This is the date/time extracted from the event, typically representing when the event was generated by the source. If the event source has no original timestamp, this value is typically populated by the first time the event was received by the pipeline. Required field for all events. | date |
| data_stream.dataset | The field can contain anything that makes sense to signify the source of the data. Examples include nginx.access, prometheus, endpoint etc. For data streams that otherwise fit, but that do not have dataset set we use the value "generic" for the dataset value. event.dataset should have the same value as data_stream.dataset. Beyond the Elasticsearch data stream naming criteria noted above, the dataset value has additional restrictions: * Must not contain - * No longer than 100 characters |
constant_keyword |
| data_stream.namespace | A user defined namespace. Namespaces are useful to allow grouping of data. Many users already organize their indices this way, and the data stream naming scheme now provides this best practice as a default. Many users will populate this field with default. If no value is used, it falls back to default. Beyond the Elasticsearch index naming criteria noted above, namespace value has the additional restrictions: * Must not contain - * No longer than 100 characters |
constant_keyword |
| data_stream.type | An overarching type for the data stream. Currently allowed values are "logs" and "metrics". We expect to also add "traces" and "synthetics" in the near future. | constant_keyword |
| event.dataset | Name of the dataset. If an event source publishes more than one type of log or events (e.g. access log, error log), the dataset is used to specify which one the event comes from. It's recommended but not required to start the dataset name with the module name, followed by a dot, then the dataset name. | constant_keyword |
| event.module | Name of the module this data is coming from. If your monitoring agent supports the concept of modules or plugins to process events of a given source (e.g. Apache logs), event.module should contain the name of this module. |
constant_keyword |
| input.type | Type of Filebeat input. | keyword |
| observer.vendor | Vendor name of the observer. | constant_keyword |
| workday.activity.activity_action | The type of action that was executed. | keyword |
| workday.activity.session_id | The system ID for tracking signons from the user signon used to make the request. | keyword |
| workday.activity.target.descriptor | The display name of the instance. | keyword |
| workday.activity.target.href | A link to the instance. | keyword |
| workday.activity.target.id | Workday Id or Reference Id of the instance. | keyword |
| workday.activity.task_display_name | The action executed in the transaction. | keyword |
| workday.activity.task_id | The Workday ID of the task executed in the transaction. | keyword |
| workday.activity.user_activity_entry_count | Returns the User Activity Count for the inputted filter parameters. | long |
Exported fields
| Field | Description | Type |
|---|---|---|
| @timestamp | Date/time when the event originated. This is the date/time extracted from the event, typically representing when the event was generated by the source. If the event source has no original timestamp, this value is typically populated by the first time the event was received by the pipeline. Required field for all events. | date |
| data_stream.dataset | The field can contain anything that makes sense to signify the source of the data. Examples include nginx.access, prometheus, endpoint etc. For data streams that otherwise fit, but that do not have dataset set we use the value "generic" for the dataset value. event.dataset should have the same value as data_stream.dataset. Beyond the Elasticsearch data stream naming criteria noted above, the dataset value has additional restrictions: * Must not contain - * No longer than 100 characters |
constant_keyword |
| data_stream.namespace | A user defined namespace. Namespaces are useful to allow grouping of data. Many users already organize their indices this way, and the data stream naming scheme now provides this best practice as a default. Many users will populate this field with default. If no value is used, it falls back to default. Beyond the Elasticsearch index naming criteria noted above, namespace value has the additional restrictions: * Must not contain - * No longer than 100 characters |
constant_keyword |
| data_stream.type | An overarching type for the data stream. Currently allowed values are "logs" and "metrics". We expect to also add "traces" and "synthetics" in the near future. | constant_keyword |
| event.dataset | Name of the dataset. If an event source publishes more than one type of log or events (e.g. access log, error log), the dataset is used to specify which one the event comes from. It's recommended but not required to start the dataset name with the module name, followed by a dot, then the dataset name. | constant_keyword |
| event.module | Name of the module this data is coming from. If your monitoring agent supports the concept of modules or plugins to process events of a given source (e.g. Apache logs), event.module should contain the name of this module. |
constant_keyword |
| input.type | Type of Filebeat input. | keyword |
| observer.vendor | Vendor name of the observer. | constant_keyword |
| workday.sign_on.Account | The Workday account associated with the sign-on (for example, the account user name and worker display name). | keyword |
| workday.sign_on.Account_Locked__Disabled_or_Expired | Whether the account was locked, disabled, or expired at the time of the sign-on. | boolean |
| workday.sign_on.Active_Session | Whether the session was still active at the time the report was generated. | boolean |
| workday.sign_on.Authentication_Channel | The channel through which the sign-on was performed (for example, Web, Mobile, API). | keyword |
| workday.sign_on.Authentication_Type | The authentication method used for the sign-on (for example, SAML, OAuth 2.0, Trusted, User Name Password, ID Token). | keyword |
| workday.sign_on.Authentication_Type_for_Signon | The authentication method used for the sign-on (for example, SAML, OAuth 2.0, Biometric, User Name Password). | keyword |
| workday.sign_on.Browser_Type | The browser or client application used for the sign-on (for example, Chrome, Workday Phone App). | keyword |
| workday.sign_on.Device_is_Trusted | Whether the device used for the sign-on is trusted. | boolean |
| workday.sign_on.Failed_Signon | Whether the sign-on attempt failed. | boolean |
| workday.sign_on.Forgotten_Password_Reset_Request | Whether the sign-on was associated with a forgotten password reset request. | boolean |
| workday.sign_on.Invalid_Credentials | Whether the sign-on attempt was made with invalid credentials. | boolean |
| workday.sign_on.Invalid_Password | Whether the sign-on attempt was made with an invalid password. | boolean |
| workday.sign_on.Is_Device_Managed | Whether the device used for the sign-on is managed. | boolean |
| workday.sign_on.Multi_Factor_Type | The type of multi-factor authentication used for the sign-on. | keyword |
| workday.sign_on.Password_Changed | Whether the password was changed during the sign-on. | boolean |
| workday.sign_on.Prompt___Positive_Integer | The sign-on prompt value as reported by Workday, typically the account name and worker display name. | keyword |
| workday.sign_on.Request_Originator | The originator of the sign-on request (for example, UI, Internal, Web Services). | keyword |
| workday.sign_on.Required_Multi_Factor | The type of multi-factor authentication required for the sign-on (for example, SMS, Email, Phone, Security Key). | keyword |
| workday.sign_on.SAML_Identity_Provider | The SAML identity provider used for the sign-on. | keyword |
| workday.sign_on.Session_ID | The Workday session identifier associated with the sign-on. | keyword |
| workday.sign_on.Signon | Whether the sign-on attempt was successful. | boolean |
| workday.sign_on.Successful | Whether the sign-on attempt was successful. | boolean |
| workday.sign_on.System_Account | The Workday system account associated with the sign-on (for example, the account user name and worker display name). | keyword |
| workday.sign_on.UI_Client_Type | The type of UI client used for the sign-on (for example, iPhone Native, Android Native). | keyword |
| workday.sign_on.Workday_Account | The Workday account associated with the sign-on (alternate report column name for System_Account). | keyword |
| workday.sign_on.session_ip_address_string | The originating IP address of the session (alternate report column name for Session_IP_Address). | keyword |
| workday.sign_on.signon_ip_address_string | The originating IP address of the sign-on (alternate report column name for Signon_IP_Address). | keyword |
Exported fields
| Field | Description | Type |
|---|---|---|
| @timestamp | Date/time when the event originated. This is the date/time extracted from the event, typically representing when the event was generated by the source. If the event source has no original timestamp, this value is typically populated by the first time the event was received by the pipeline. Required field for all events. | date |
| data_stream.dataset | The field can contain anything that makes sense to signify the source of the data. Examples include nginx.access, prometheus, endpoint etc. For data streams that otherwise fit, but that do not have dataset set we use the value "generic" for the dataset value. event.dataset should have the same value as data_stream.dataset. Beyond the Elasticsearch data stream naming criteria noted above, the dataset value has additional restrictions: * Must not contain - * No longer than 100 characters |
constant_keyword |
| data_stream.namespace | A user defined namespace. Namespaces are useful to allow grouping of data. Many users already organize their indices this way, and the data stream naming scheme now provides this best practice as a default. Many users will populate this field with default. If no value is used, it falls back to default. Beyond the Elasticsearch index naming criteria noted above, namespace value has the additional restrictions: * Must not contain - * No longer than 100 characters |
constant_keyword |
| data_stream.type | An overarching type for the data stream. Currently allowed values are "logs" and "metrics". We expect to also add "traces" and "synthetics" in the near future. | constant_keyword |
| event.dataset | Name of the dataset. If an event source publishes more than one type of log or events (e.g. access log, error log), the dataset is used to specify which one the event comes from. It's recommended but not required to start the dataset name with the module name, followed by a dot, then the dataset name. | constant_keyword |
| event.module | Name of the module this data is coming from. If your monitoring agent supports the concept of modules or plugins to process events of a given source (e.g. Apache logs), event.module should contain the name of this module. |
constant_keyword |
| input.type | Type of Filebeat input. | keyword |
| observer.vendor | Vendor name of the observer. | constant_keyword |
| workday.user.Cost_Center | The cost center the worker belongs to. | keyword |
| workday.user.Job_Title | The job title held by the worker. | keyword |
| workday.user.Last_Account_or_Proxy_Login_Moment | The date and time of the worker's last account or proxy login, as reported by Workday. | date |
| workday.user.Manager_Email | The work email address of the worker's manager. | keyword |
| workday.user.Manager_ID | The Workday Employee ID of the worker's manager. | keyword |
| workday.user.WorkerIsManager | Whether the worker is a manager. | boolean |
| workday.user.Worker_Status | The current status of the worker (for example, Active, Retired). | keyword |
| workday.user.Worker_Type | The classification of the worker (for example, Employee, Contingent Worker). | keyword |
| workday.user.Worker_s_Manager | The display name of the worker's manager, including their Employee ID. | keyword |
| workday.user.location | The work location of the worker. | keyword |
| workday.user.termination_date | The date the worker was terminated, when applicable. | date |
Example
{
    "@timestamp": "2026-04-02T12:46:18.012Z",
    "agent": {
        "ephemeral_id": "fdc15701-b03f-491e-8e22-c056b584ae8a",
        "id": "212a329f-1ab7-4422-8b62-341360200cb2",
        "name": "elastic-agent-72002",
        "type": "filebeat",
        "version": "8.19.0"
    },
    "data_stream": {
        "dataset": "workday.activity",
        "namespace": "73594",
        "type": "logs"
    },
    "device": {
        "type": "desktop"
    },
    "ecs": {
        "version": "9.5.0"
    },
    "elastic_agent": {
        "id": "212a329f-1ab7-4422-8b62-341360200cb2",
        "snapshot": false,
        "version": "8.19.0"
    },
    "event": {
        "action": "read",
        "agent_id_status": "verified",
        "category": [
            "iam"
        ],
        "dataset": "workday.activity",
        "ingested": "2026-08-25T06:50:26Z",
        "kind": "event",
        "original": "{\"activityAction\":\"READ\",\"deviceType\":\"Desktop\",\"ipAddress\":\"127.0.0.1\",\"requestTime\":\"2026-04-02T12:46:18.012Z\",\"sessionId\":\"c7c6ff\",\"systemAccount\":\"wd-implementer\",\"taskDisplayName\":\"privacy/activityLogging/userActivity (GET) (v1 -  )\",\"taskId\":\"e67b812850dc100047be196f396d745f\",\"userAgent\":\"Mozilla/5.0 (Windows NT 10.0; Win64; x64) AppleWebKit/537.36 (KHTML, like Gecko) Chrome/146.0.0.0 Safari/537.36\"}",
        "type": [
            "info"
        ]
    },
    "input": {
        "type": "cel"
    },
    "related": {
        "ip": [
            "127.0.0.1"
        ],
        "user": [
            "wd-implementer"
        ]
    },
    "source": {
        "ip": "127.0.0.1"
    },
    "tags": [
        "preserve_original_event",
        "forwarded",
        "workday-activity"
    ],
    "user": {
        "name": "wd-implementer"
    },
    "user_agent": {
        "device": {
            "name": "Other"
        },
        "name": "Chrome",
        "original": "Mozilla/5.0 (Windows NT 10.0; Win64; x64) AppleWebKit/537.36 (KHTML, like Gecko) Chrome/146.0.0.0 Safari/537.36",
        "os": {
            "full": "Windows 10",
            "name": "Windows",
            "version": "10"
        },
        "version": "146.0.0.0"
    },
    "workday": {
        "activity": {
            "activity_action": "READ",
            "session_id": "c7c6ff",
            "task_display_name": "privacy/activityLogging/userActivity (GET) (v1 -  )",
            "task_id": "e67b812850dc100047be196f396d745f"
        }
    }
}
Example
{
    "@timestamp": "2026-08-25T06:51:16.698Z",
    "agent": {
        "ephemeral_id": "b0b803b9-1ef0-453a-af7f-a0f2ad9053c6",
        "id": "af409a53-c702-40f8-8967-fe5ac84d1149",
        "name": "elastic-agent-45156",
        "type": "filebeat",
        "version": "8.19.0"
    },
    "data_stream": {
        "dataset": "workday.sign_on",
        "namespace": "42668",
        "type": "logs"
    },
    "device": {
        "type": "Desktop"
    },
    "ecs": {
        "version": "9.5.0"
    },
    "elastic_agent": {
        "id": "af409a53-c702-40f8-8967-fe5ac84d1149",
        "snapshot": false,
        "version": "8.19.0"
    },
    "event": {
        "action": "user-signon",
        "agent_id_status": "verified",
        "category": [
            "authentication",
            "session"
        ],
        "dataset": "workday.sign_on",
        "end": "2026-06-19T06:25:22.000Z",
        "ingested": "2026-08-25T06:51:19Z",
        "kind": "event",
        "original": "{\"Account_Locked__Disabled_or_Expired\":\"0\",\"Active_Session\":\"0\",\"Authentication_Type_for_Signon\":\"SAML\",\"Browser_Type\":\"Chrome\",\"Device_Type\":\"Desktop\",\"Device_is_Trusted\":\"0\",\"Failed_Signon\":\"0\",\"Forgotten_Password_Reset_Request\":\"0\",\"Invalid_Credentials\":\"0\",\"Is_Device_Managed\":\"0\",\"Operating_System\":\"Mac OS X\",\"Password_Changed\":\"0\",\"Request_Originator\":\"UI\",\"SAML_Identity_Provider\":\"IdP_Acme\",\"Session_End\":\"2026-06-18T23:25:22-07:00\",\"Session_Start\":\"2026-06-18T16:59:32-07:00\",\"System_Account\":\"user534.acme / User 534\"}",
        "outcome": "success",
        "start": "2026-06-18T23:59:32.000Z",
        "type": [
            "start",
            "end"
        ]
    },
    "host": {
        "entity": {
            "attributes": {
                "managed": false
            },
            "lifecycle": {
                "last_activity": "2026-06-19T06:25:22.000Z"
            }
        },
        "os": {
            "name": "Mac OS X"
        }
    },
    "input": {
        "type": "cel"
    },
    "tags": [
        "preserve_original_event",
        "forwarded",
        "workday-sign_on"
    ],
    "user_agent": {
        "name": "Chrome"
    },
    "workday": {
        "sign_on": {
            "Account_Locked__Disabled_or_Expired": false,
            "Active_Session": false,
            "Authentication_Type": "SAML",
            "Authentication_Type_for_Signon": "SAML",
            "Browser_Type": "Chrome",
            "Device_is_Trusted": false,
            "Failed_Signon": false,
            "Forgotten_Password_Reset_Request": false,
            "Invalid_Credentials": false,
            "Is_Device_Managed": false,
            "Password_Changed": false,
            "Request_Originator": "UI",
            "SAML_Identity_Provider": "IdP_Acme",
            "System_Account": "user534.acme / User 534"
        }
    }
}
Example
{
    "@timestamp": "2024-03-19T00:00:00.000Z",
    "agent": {
        "ephemeral_id": "1f9df58a-a55d-40cc-b690-52f7adc9ba95",
        "id": "1ec749f8-732a-4171-b92e-c9679fbddb98",
        "name": "elastic-agent-89181",
        "type": "filebeat",
        "version": "8.19.0"
    },
    "data_stream": {
        "dataset": "workday.user",
        "namespace": "73169",
        "type": "logs"
    },
    "ecs": {
        "version": "9.5.0"
    },
    "elastic_agent": {
        "id": "1ec749f8-732a-4171-b92e-c9679fbddb98",
        "snapshot": false,
        "version": "8.19.0"
    },
    "event": {
        "agent_id_status": "verified",
        "category": [
            "iam"
        ],
        "dataset": "workday.user",
        "ingested": "2026-08-25T07:08:39Z",
        "kind": "asset",
        "original": "{\"Cost_Center\":\"Support\",\"Employee_ID\":\"007066\",\"Hire_Date\":\"2024-03-19\",\"Job_Title\":\"Customer Support Representative I\",\"Last_Account_or_Proxy_Login_Moment\":\"2024-12-24T00:44:07.572-08:00\",\"Manager_Email\":\"manager1@example.com\",\"Manager_ID\":\"000687\",\"Organization_Roles\":\"Cost Center Manager; Manager\",\"User-Based_Security_Groups_for_User\":\"Report Writer\",\"User_Name\":\"jdoe\",\"WorkerIsManager\":\"1\",\"Worker_Type\":\"Employee\",\"Worker_s_Manager\":\"Alex Manager (000687)\",\"location\":\"Mexico - Distributed\",\"primaryWorkEmail\":\"jdoe@example.com\"}",
        "type": [
            "user"
        ]
    },
    "input": {
        "type": "cel"
    },
    "related": {
        "user": [
            "007066",
            "jdoe",
            "jdoe@example.com",
            "000687",
            "manager1@example.com",
            "Alex Manager (000687)"
        ]
    },
    "tags": [
        "preserve_original_event",
        "forwarded",
        "workday-user"
    ],
    "user": {
        "domain": "example.com",
        "email": "jdoe@example.com",
        "group": {
            "name": [
                "Report Writer"
            ]
        },
        "id": "007066",
        "name": "jdoe",
        "roles": [
            "Cost Center Manager",
            "Manager"
        ]
    },
    "workday": {
        "user": {
            "Cost_Center": "Support",
            "Job_Title": "Customer Support Representative I",
            "Last_Account_or_Proxy_Login_Moment": "2024-12-24T08:44:07.572Z",
            "Manager_Email": "manager1@example.com",
            "Manager_ID": "000687",
            "WorkerIsManager": true,
            "Worker_Type": "Employee",
            "Worker_s_Manager": "Alex Manager (000687)",
            "location": "Mexico - Distributed"
        }
    }
}
These inputs are used in the integration:
This integration uses the following Workday APIs:
- Activity: Workday Activity API documentation.
- Sign-on: The Workday Reports as a Service (RaaS) JSON endpoint is used to fetch a user-defined Sign-on custom report. On each poll the integration appends the report's required moment-range prompts:
GET https://HOST/ccx/service/customreport2/TENANT/REPORT_OWNER/REPORT_NAME?format=json&From_Moment=...&To_Moment=...
- User: The Workday Reports as a Service (RaaS) JSON endpoint is used to fetch a user-defined Worker custom report:
GET https://HOST/ccx/service/customreport2/TENANT/REPORT_OWNER/REPORT_NAME?format=json
This integration includes one or more Kibana dashboards that visualizes the data collected by the integration. The screenshots below illustrate how the ingested data is displayed.
Changelog
| Version | Details | Minimum Kibana version |
|---|---|---|
| 0.6.1 | Bug fix (View pull request) Preserve Sign-on initial_interval in CEL state so a failed poll does not drop it and break the next collection. Bug fix (View pull request) Disable the user data stream by default so upgrades from policies created before that stream do not require user report credentials. Bug fix (View pull request) Disable the sign-on data stream by default so upgrades from policies created before that stream do not require sign-on report credentials. |
9.1.0 8.19.0 |
| 0.6.0 | Enhancement (View pull request) Add a default ILM policy to the user data stream that rolls over the backing index every 12 hours and deletes data 7 days after rollover, preventing document conflicts from the stable Employee_ID fingerprint. |
9.1.0 8.19.0 |
| 0.5.1 | Bug fix (View pull request) Fix optional field access syntax in user data stream. |
9.1.0 8.19.0 |
| 0.5.0 | Enhancement (View pull request) Add support for user data stream. |
9.1.0 8.19.0 |
| 0.4.0 | Enhancement (View pull request) Add tags to ingest pipeline processors and add preserve_original_event to pipeline-level on_failure handlers. |
9.1.0 8.18.0 |
| 0.3.2 | Bug fix (View pull request) Fix Sign-on RaaS collection by injecting From_Moment/To_Moment prompts and advancing a collection cursor. |
9.1.0 8.18.0 |
| 0.3.1 | Enhancement (View pull request) Set agentless deployment mode release field to ga. |
9.1.0 8.18.0 |
| 0.3.0 | Enhancement (View pull request) Add support for sign_on data stream. |
9.1.0 8.18.0 |
| 0.2.0 | Bug fix (View pull request) Fix token refresh after 401 by adding TTL-based expiry tracking. |
9.0.0 8.18.0 |
| 0.1.0 | Enhancement (View pull request) Add support for activity data stream. |
9.0.0 8.18.0 |